Installation de Tubulures de Roues en Fibre de Carbone : Le Guide Professionnel Complet

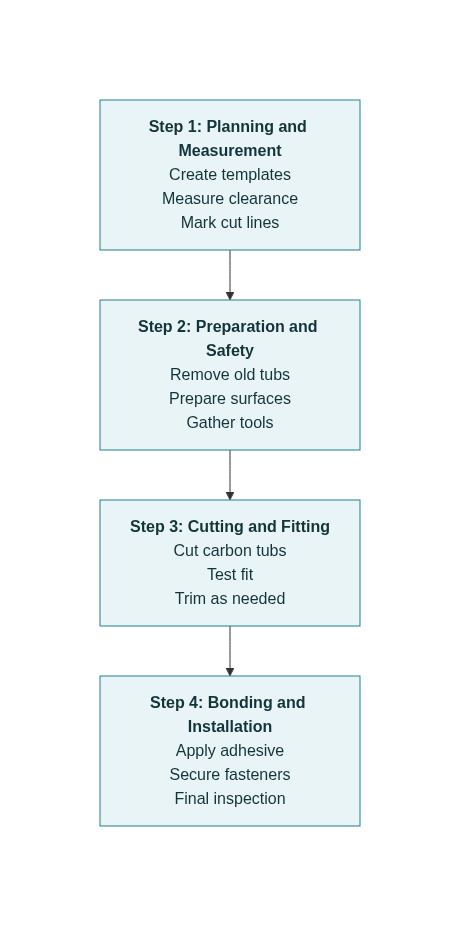
L'installation de passages de roues en fibre de carbone représente l'une des modifications les plus significatives que vous puissiez apporter à votre véhicule de course ou de performance. Ces composants légers et à haute résistance permettent non seulement d'accueillir des pneus plus larges pour une meilleure adhérence, mais réduisent également le poids non suspendu tout en maintenant l'intégrité structurelle dans des conditions de course extrêmes. Ce guide complet décompose l'ensemble du processus d'installation en quatre étapes gérables, garantissant des résultats professionnels à chaque fois.
Les passages de roues en fibre de carbone ont révolutionné les modifications de performance automobile, offrant des rapports résistance/poids supérieurs par rapport aux alternatives traditionnelles en acier. Les équipes de course professionnelles et les passionnés sérieux choisissent les passages en fibre de carbone pour leur capacité à accueillir des pneus de taille massive tout en contribuant à la réduction globale du poids du véhicule. Le processus d'installation, bien que technique, peut être réalisé avec une planification adéquate et une attention aux détails.
Comprendre les Passages de Roues en Fibre de Carbone
Que sont les Passages de Roues en Fibre de Carbone ?

Les passages de roues en fibre de carbone sont des passages de roue de remplacement conçus avec précision pour accueillir des pneus nettement plus larges que ne le permettent les configurations d'origine. Ces composants sont fabriqués à partir de matériaux composites avancés, utilisant généralement de la toile de carbone posée à la main avec une résine ignifuge, suivie d'un durcissement sous vide pour éliminer les bulles d'air et garantir une résistance optimale.
Le processus de fabrication crée des composants non seulement incroyablement résistants, mais aussi remarquablement légers. Un passage de roue en fibre de carbone d'un diamètre de 47 pouces correctement construit pèse environ une livre, contre des équivalents en acier qui peuvent peser dix fois plus. Cette réduction de poids se produit dans une zone critique du véhicule, car le poids non suspendu affecte directement la tenue de route, l'accélération et les performances de freinage.
Pourquoi Choisir la Fibre de Carbone Face aux Alternatives ?
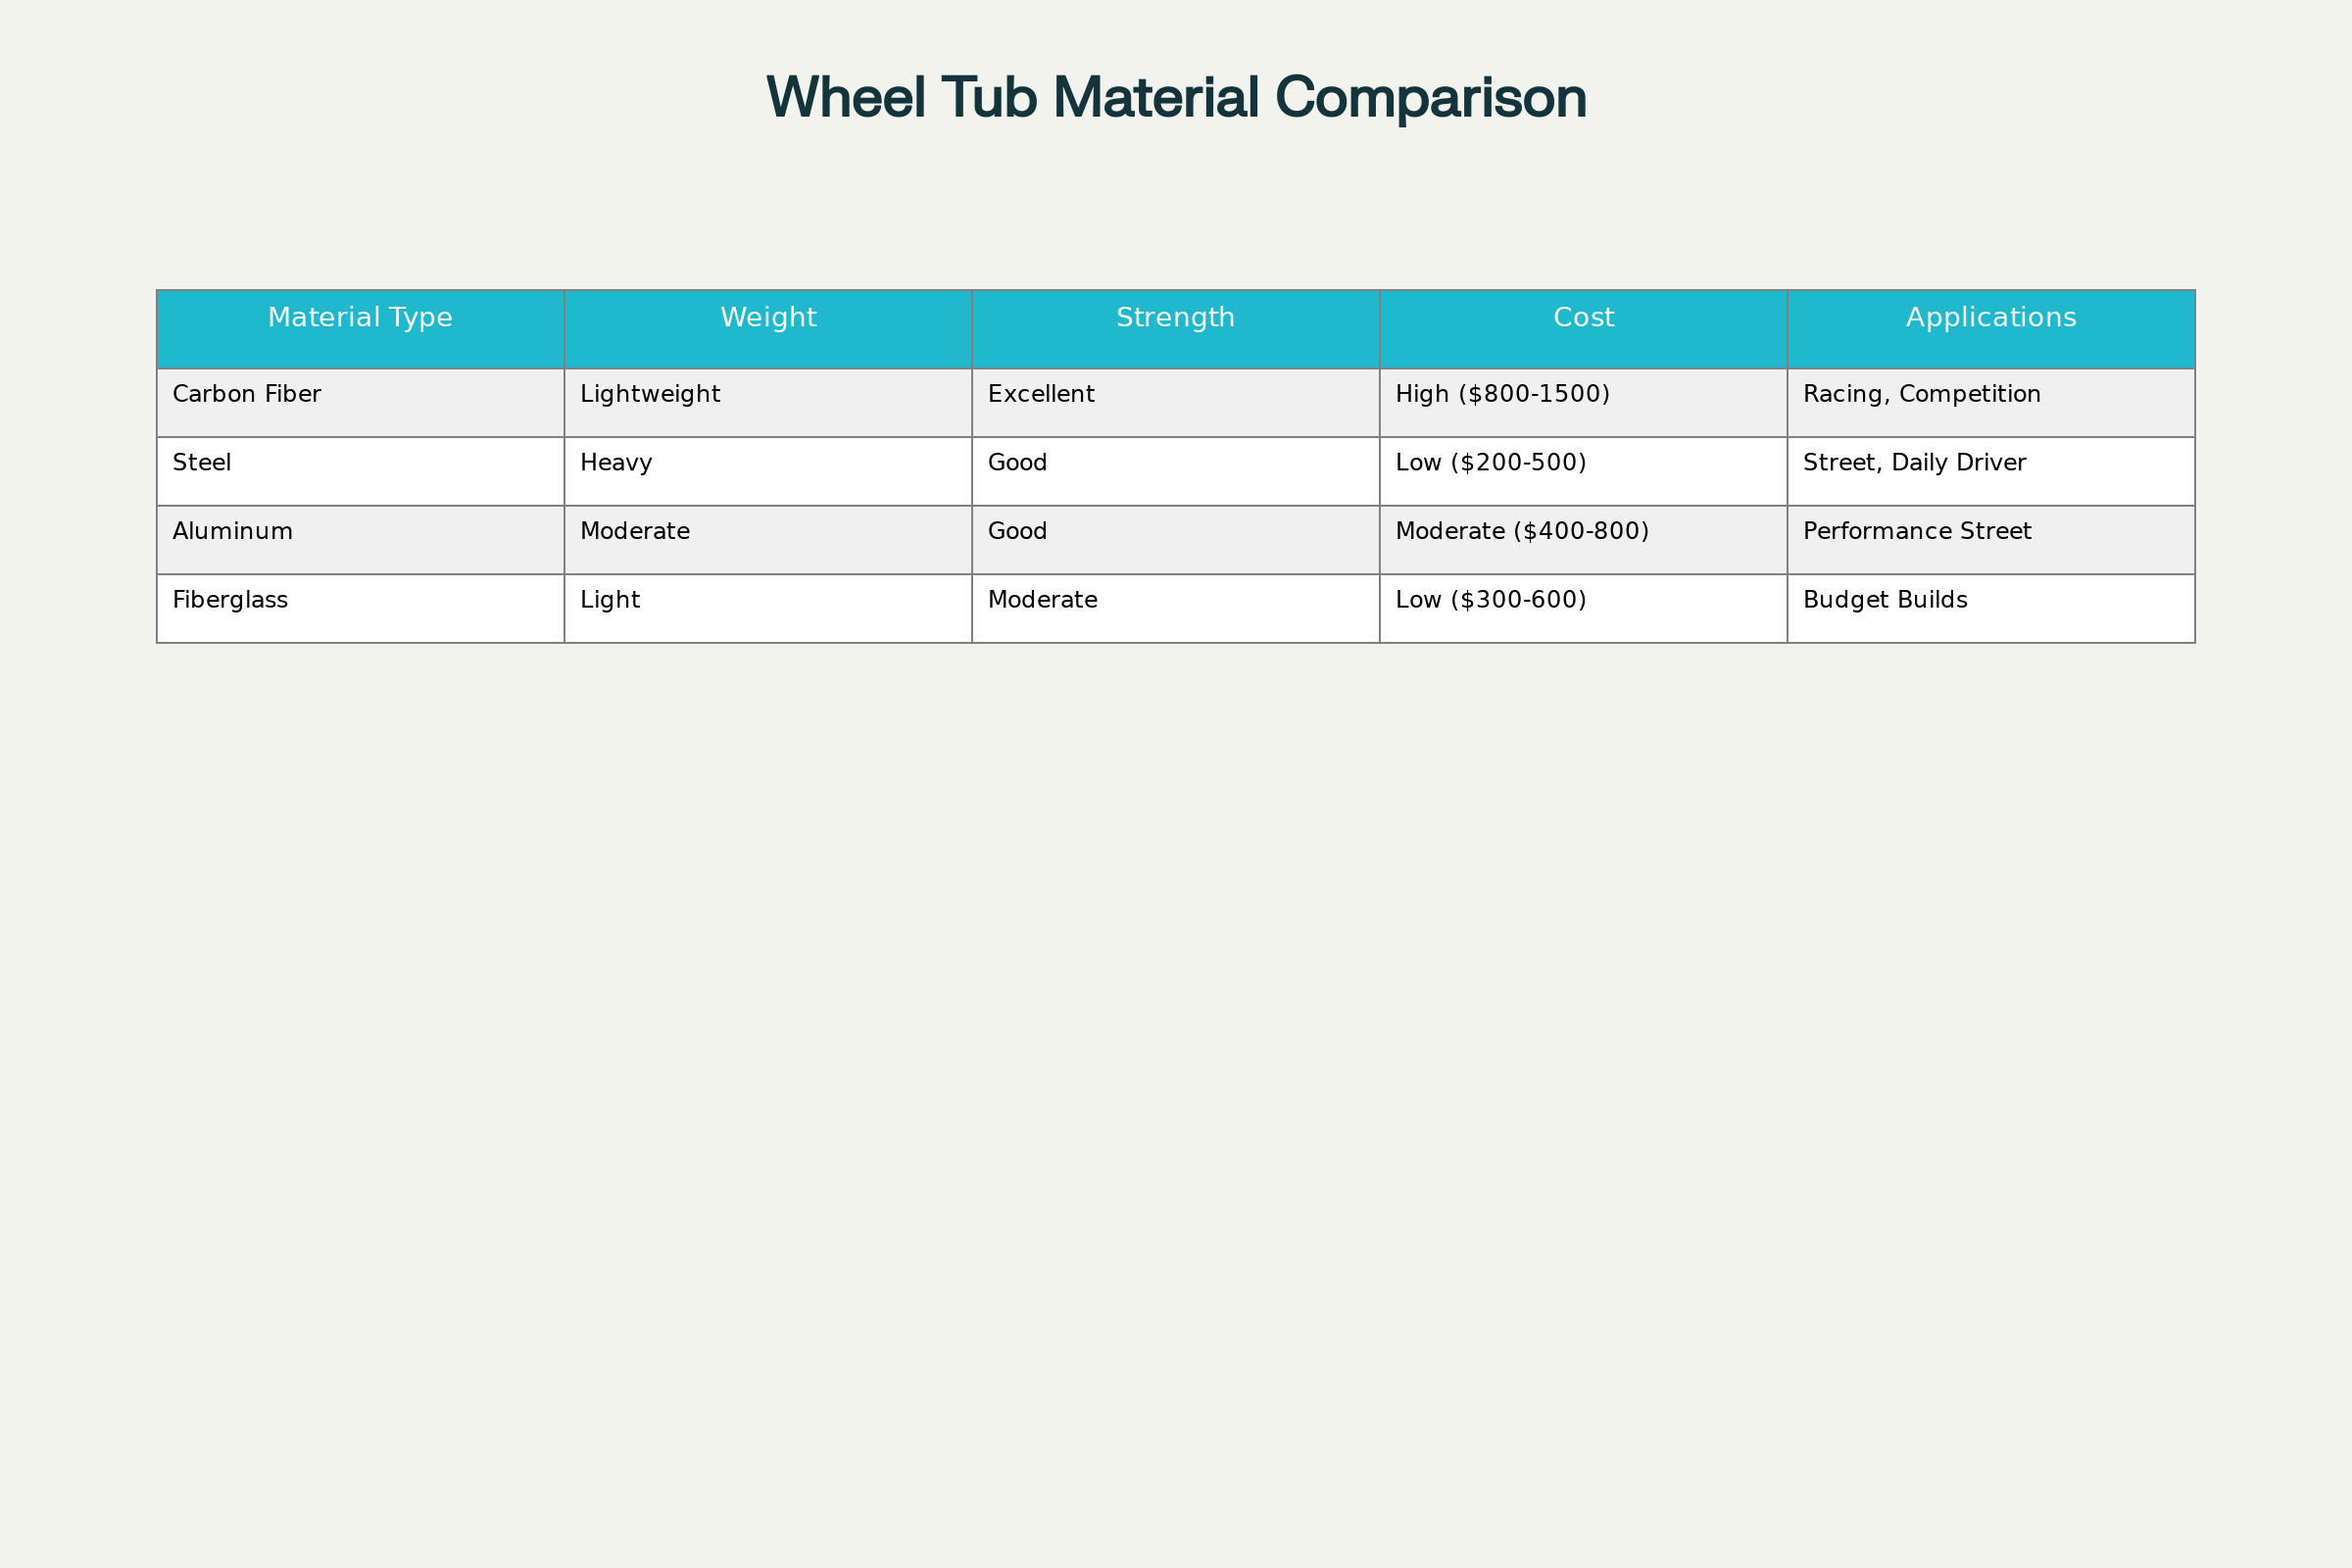
La comparaison des matériaux révèle pourquoi la fibre de carbone est devenue le choix privilégié pour les applications de performance sérieuses. Contrairement aux passages en acier qui ajoutent un poids significatif et aux options en aluminium qui peuvent manquer de résistance ultime, la fibre de carbone offre l'équilibre idéal de propriétés. La nature anisotrope du matériau permet aux ingénieurs d'orienter les fibres dans des directions spécifiques pour supporter les charges attendues, créant des composants qui surpassent la résistance des alternatives métalliques tout en pesant une fraction de leur poids.
Les applications de course professionnelles ont validé les références de performance de la fibre de carbone. Les équipes de Formule 1 utilisent désormais des composites de fibre de carbone biosourcés sur des composants techniquement exigeants comme les déflecteurs de roue de conduits de frein, démontrant la capacité du matériau à résister à des conditions de course extrêmes. Cette avancée technologique s'est diffusée vers les applications grand public, rendant les composants en fibre de carbone de qualité professionnelle accessibles aux passionnés sérieux.
Étape 1 : Phase de Planification et de Mesure
Évaluation Essentielle Pré-Installation

La base de toute installation réussie de passages de roues commence par une planification complète et des mesures précises. Cette phase détermine le succès de l'ensemble du projet et prévient les erreurs coûteuses lors de la fabrication et de l'installation. Les fabricants professionnels soulignent qu'une planification adéquate peut réduire le temps d'installation jusqu'à 50 % tout en garantissant un ajustement optimal.
Commencez par évaluer la configuration actuelle des passages de roue de votre véhicule et déterminez la taille maximale de pneu que vous souhaitez accueillir. Prenez en compte à la fois les besoins actuels et les possibilités de mise à niveau futures, car la modification des passages de roues après installation devient nettement plus complexe et coûteuse. Documentez la géométrie de suspension du véhicule, en notant tous les composants qui pourraient interférer avec des passages de roue agrandis.
Création de Gabarits Précis
Le processus de création de gabarit exige une précision et une patience exceptionnelles. Les installateurs professionnels recommandent d'utiliser du carton ondulé épais pour les gabarits initiaux, car ce matériau est facile à travailler tout en étant suffisamment robuste pour un transfert précis vers les composants en fibre de carbone. Le processus implique plusieurs étapes critiques qui garantissent un ajustement parfait.
Commencez par créer un cercle de 47 pouces de diamètre (ou la taille choisie) sur le carton à l'aide d'un compas ou de la méthode de la ficelle. Découpez ce gabarit soigneusement et testez son ajustement à l'emplacement de montage prévu. Utilisez un niveau pour vous assurer que le gabarit est correctement aligné avec la géométrie du véhicule. Marquez tous les points d'interférence, les trous de montage et les exigences de dégagement directement sur le gabarit.
Le gabarit doit tenir compte de l'enveloppement du passage autour de la zone de l'aile arrière. Créez des gabarits secondaires pour ces sections courbes, en utilisant du ruban de masquage pour combler les écarts et obtenir une conformité étroite aux contours de la carrosserie. Cette attention aux détails lors de la création du gabarit prévient les problèmes d'ajustement lors de l'installation finale.
Mesure des Exigences de Dégagement
Des mesures de dégagement précises préviennent toute interférence avec les composants de suspension, les systèmes de freinage et les panneaux de carrosserie. Utilisez des outils de mesure appropriés, notamment des règles droites, des mètres ruban et des serre-joints en C pour déterminer l'espace disponible. Prenez des mesures à plusieurs points, y compris les positions horizontales, à 45 degrés et à 90 degrés par rapport au centre du moyeu.
Les points de dégagement critiques incluent :
-
Dégagement des composants de suspension : Mesurez les distances par rapport aux amortisseurs, aux ressorts, aux bras de contrôle et aux barres stabilisatrices
-
Dégagement du système de freinage : Assurez un espace suffisant pour les étriers, les disques et les conduites de frein
-
Dégagement des panneaux de carrosserie : Vérifiez un espace suffisant par rapport aux lèvres d'aile et aux ailes arrière
-
Jeu des pneus : Prendre en compte la dilatation du pneu sous charge et la course de la suspension
Les installateurs professionnels recommandent de maintenir un jeu d'au moins 10-15 mm par rapport aux composants mobiles pour éviter tout contact lors de la compression de la suspension ou des braquages. Documentez soigneusement toutes les mesures, car elles guideront à la fois la fabrication et les procédures d'installation finale.
Étape 2 : Phase de préparation et de sécurité

Équipement de sécurité et préparation de l'espace de travail
Le travail de la fibre de carbone nécessite des précautions de sécurité spécifiques en raison de la génération de poussières lors de la découpe et de l'exposition aux produits chimiques des adhésifs. L'équipement de protection individuelle (EPI) approprié comprend des lunettes de sécurité, une protection respiratoire, des gants et des systèmes de ventilation. L'espace de travail doit être bien ventilé avec des capacités d'aspiration des poussières lorsque cela est possible.
L'équipement de sécurité essentiel comprend :
-
Protection respiratoire : Utiliser des masques ou des respirateurs adaptés aux poussières de composites
-
Protection oculaire : Lunettes de sécurité ou lunettes de protection pour empêcher les fragments de fibres de pénétrer dans les yeux
-
Protection cutanée : Manches longues et gants pour prévenir l'irritation de la peau par la poussière de fibre de carbone
-
Ventilation : Une circulation d'air adéquate pour éliminer les particules en suspension et les vapeurs chimiques
Techniques de préparation des surfaces
Une préparation adéquate des surfaces garantit une adhérence optimale entre le bac en fibre de carbone et la structure du véhicule. Ce processus implique le nettoyage, le dégraissage et l'abrasion des surfaces pour créer des conditions de collage idéales. Une préparation de surface de qualité professionnelle peut augmenter la résistance du collage jusqu'à 300 % par rapport à des surfaces insuffisamment préparées.
Commencez par nettoyer soigneusement toutes les surfaces de montage avec des solvants appropriés tels que l'acétone ou l'alcool isopropylique. Retirez toutes traces de peinture, d'antirouille, de rouille ou de contamination des zones où le bac se liera au châssis ou aux panneaux de carrosserie. Utilisez du papier de verre grain 120 pour créer une texture de surface qui favorise l'adhérence mécanique.
Préparation des outils et du matériel
Organisez tous les outils et matériaux nécessaires avant de commencer le processus d'installation. Cette préparation évite les retards pendant les phases critiques de collage lorsque les adhésifs ont un temps de travail limité. Les installateurs professionnels créent des listes de contrôle détaillées pour s'assurer que rien n'est oublié pendant l'installation proprement dite.
Les outils requis comprennent :
-
Équipement de découpe : Lames diamantées, scies sauteuses ou outils de découpe spécialisés pour composites
-
Instruments de mesure : Rubans à mesurer de précision, équerres et niveaux
-
Matériel de fixation : Vis à métaux, rivets et adhésifs de collage de panneaux
-
Outils de préparation de surface : Ponçeuses, abrasifs et solvants de nettoyage
La préparation du matériel implique de conditionner les adhésifs à des températures appropriées et de s'assurer que tous les composants sont propres et prêts pour l'installation. De nombreux adhésifs structuraux nécessitent des plages de température spécifiques pour un durcissement optimal, ce qui rend le contrôle environnemental une considération importante.
Étape 3 : Phase de découpe et d'ajustement
Techniques de découpe de la fibre de carbone
La découpe de la fibre de carbone nécessite des techniques spécialisées pour éviter le délaminage, la brûlure et l'effilochage qui peuvent compromettre l'intégrité structurelle du matériau. Les fabricants professionnels utilisent des types de lames et des vitesses de coupe spécifiques pour obtenir des coupes nettes et précises tout en minimisant les déchets.
L'approche de découpe optimale dépend de la construction et de l'épaisseur spécifiques de la fibre de carbone. Pour la plupart des applications de passage de roue, utilisez des lames diamantées à dents fines à des vitesses modérées avec un refroidissement adéquat. Les méthodes de découpe humide aident à contrôler la poussière et à prévenir la surchauffe qui peut endommager la matrice de résine. Coupez toujours légèrement surdimensionné pour permettre les ajustements finaux de rognage et d'ajustement.
Problèmes de découpe courants et solutions
Plusieurs problèmes surviennent couramment lors de la découpe de la fibre de carbone, chacun nécessitant des solutions spécifiques pour maintenir l'intégrité du composant :
Prévention du délaminage : Cela se produit lorsque des couches individuelles se séparent pendant la découpe. Des vitesses de coupe lentes et des lames tranchantes minimisent ce problème. Soutenez les deux côtés de la ligne de coupe pour empêcher la rupture du matériau au fur et à mesure de la progression de la coupe.
Contrôle de la surchauffe : Une chaleur excessive provoque l'écoulement de la résine et la dégradation du matériau. Utilisez des fluides de coupe ou des pauses de refroidissement périodiques pour les sections épaisses. Surveillez la température de la lame et remplacez-la lorsque les performances de coupe se dégradent.
Gestion de la qualité des bords : Des bords effilochés compromettent à la fois l'apparence et les performances structurelles. Le ponçage post-découpe avec des abrasifs à grain fin crée des bords lisses et professionnels tout en éliminant les fibres lâches.
Procédures d'essai d'ajustement
Un essai d'ajustement approprié prévient les problèmes majeurs lors de l'assemblage final et garantit un alignement optimal des composants. Ce processus implique plusieurs cycles d'ajustement avec un affinement progressif jusqu'à l'obtention d'un ajustement parfait. Les installateurs professionnels ne bâclent jamais cette phase, car les corrections deviennent de plus en plus difficiles une fois les adhésifs appliqués.
Commencez par un ajustement grossier pour vérifier les dimensions globales et les jeux. Marquez tous les points de gêne ou les zones nécessitant un rognage supplémentaire. Utilisez des fixations temporaires ou des serre-joints pour maintenir le bac en position tout en vérifiant l'alignement avec les composants de suspension et les panneaux de carrosserie. Effectuez des ajustements incrémentiels plutôt que de grandes corrections pour maintenir la précision dimensionnelle.
Documentez la configuration d'ajustement finale avec des photographies et des mesures. Cette documentation s'avère inestimable lors du réassemblage et fournit des points de référence pour toute modification future. Portez une attention particulière à l'alignement des points de montage, car ces emplacements subissent les charges structurelles les plus élevées pendant le fonctionnement.
Étape 4 : Phase de collage et d'installation
Sélection et application de l'adhésif
La phase d'installation finale nécessite une sélection et une application minutieuses d'adhésifs structuraux qui lieront de manière permanente le bac en fibre de carbone à la structure du véhicule. Les adhésifs de collage de panneaux de qualité professionnelle offrent la résistance et la durabilité nécessaires pour les applications de course.
La plupart des installations bénéficient d'adhésifs époxy bi-composants spécifiquement formulés pour les applications en fibre de carbone. Le 3M Scotch-Weld DP-420 NS représente la référence du secteur, offrant une excellente résistance d'adhésion avec des caractéristiques "anti-affaissement" qui empêchent l'écoulement de l'adhésif pendant la polymérisation. Prenez en compte le temps de travail de l'adhésif, les exigences environnementales et ses caractéristiques de résistance finale lors de la sélection.
Techniques de collage appropriées
Un collage réussi nécessite une attention particulière aux conditions environnementales, à la préparation des surfaces et aux techniques d'application. Le collage optimal se produit à des températures comprises entre 70 et 80 °F avec une humidité relative inférieure à 50 %. Nettoyez toutes les surfaces à coller immédiatement avant l'application de l'adhésif pour éliminer toute contamination.
Appliquez l'adhésif généreusement sur les deux surfaces, en assurant une couverture à 100 % de la zone de collage. Lors de l'assemblage des surfaces, un excès d'adhésif doit être visible autour de la ligne de collage, indiquant une distribution correcte de l'adhésif. Retirez l'excès d'adhésif immédiatement tant qu'il est encore malléable pour éviter des problèmes de finition ultérieurs.
Exigences de fixation mécanique
Bien que le collage adhésif assure la fixation structurelle principale, les fixations mécaniques ajoutent une redondance et répartissent les charges sur des zones plus larges. Les installations professionnelles combinent le collage des panneaux avec des vis à métaux ou des rivets placés stratégiquement pour une sécurité maximale.
Le placement des fixations doit éviter les zones de haute contrainte tout en assurant une répartition adéquate de la charge. Utilisez du matériel résistant à la corrosion, tel que l'acier inoxydable ou l'aluminium, pour prévenir la corrosion galvanique entre matériaux dissemblables. Appliquez des composés de blocage de filetage pour empêcher le desserrage des fixations sous l'effet des vibrations.
Polymérisation et inspection finale
Une polymérisation correcte garantit que l'adhésif atteint sa pleine résistance avant que le véhicule ne retourne en service. La plupart des adhésifs structurels nécessitent 24 à 48 heures pour une polymérisation complète à température ambiante, bien que des températures élevées puissent accélérer ce processus. Maintenez un support et un alignement appropriés pendant toute la période de polymérisation.
Effectuez une inspection approfondie après la fin de la polymérisation, en vérifiant :
-
Intégrité de la ligne de collage : Vérifiez une adhésion complète sans vides ni interstices
-
Couple de serrage des fixations : Confirmez que toutes les fixations mécaniques respectent les spécifications
-
Vérification des jeux : Revérifiez tous les jeux avec la suspension dans différentes positions
-
Finition de surface : Traitez tout problème esthétique avant l'assemblage final
Dépannage des problèmes d'installation courants
Problèmes d'ajustement
Malgré un gabaritage minutieux, des problèmes d'ajustement surviennent occasionnellement lors de l'installation. La plupart des problèmes proviennent de mesures initiales inadéquates ou de changements dans la configuration du véhicule depuis le gabaritage. Traitez les problèmes d'ajustement de manière systématique plutôt que de forcer les composants en place, car cela peut créer des concentrations de contraintes menant à une défaillance prématurée.
Les solutions d'ajustement courantes incluent :
-
Réglage mineur : Utilisez des abrasifs à grain fin pour retirer de petites quantités de matériau
-
Calage : Ajoutez des cales minces pour corriger les problèmes d'alignement
-
Renforcement : Renforcez les zones nécessitant une modification pour maintenir l'intégrité structurelle
Défaillances d'adhésion
Une mauvaise adhésion résulte généralement de surfaces contaminées, d'un choix incorrect d'adhésif ou de conditions environnementales inappropriées pendant le collage. La prévention par une préparation adéquate des surfaces et un contrôle environnemental élimine la plupart des problèmes d'adhésion. Si des défaillances surviennent, un retrait complet et une nouvelle préparation des surfaces sont généralement nécessaires.
Problèmes de jeu
Un jeu insuffisant peut provoquer un contact entre le passage de roue et les composants mobiles, entraînant une usure et des dommages potentiels. Traitez les problèmes de jeu en modifiant le passage de roue plutôt que les composants de suspension lorsque cela est possible, car cela préserve les caractéristiques de performance d'origine du véhicule tout en s'accommodant des passages de roue plus larges.
Maintenance et entretien à long terme
Procédures d'inspection régulières
Les passages de roue en fibre de carbone nécessitent un entretien minimal comparé aux alternatives métalliques, mais une inspection régulière garantit une performance et une sécurité continues. Établissez un calendrier d'inspection coïncidant avec les autres activités de maintenance du véhicule, typiquement tous les 3 000 à 5 000 miles pour les applications de course.
Concentrez les efforts d'inspection sur :
-
Intégrité de la ligne de collage : Recherchez des signes de délaminage ou de défaillance de l'adhésif
-
État des fixations : Vérifiez les spécifications de couple et inspectez la corrosion
-
Dommages de surface : Recherchez des dommages d'impact, des fissures ou une usure excessive
-
Maintenance des jeux : Confirmez que des jeux adéquats subsistent après l'usure de la suspension
Procédures de réparation
Les dommages mineurs sur les composants en fibre de carbone peuvent souvent être réparés en utilisant des techniques et des matériaux appropriés. Les rayures de surface et les petits dommages d'impact répondent bien aux procédures de réparation correctes, tandis que les dommages structurels majeurs nécessitent généralement le remplacement du composant.
Les réparations réussies nécessitent :
-
Évaluation des dommages : Déterminez l'étendue et le type de dommage
-
Compatibilité des matériaux : Utilisez des matériaux de réparation compatibles avec la construction d'origine
-
Technique appropriée : Suivez les procédures de réparation établies pour la fibre de carbone
-
Vérification de la qualité : Testez les réparations minutieusement avant de remettre en service
Avantages de performance et résultats
Avantages de la réduction de poids
La réduction de poids obtenue par l'installation de cuves de roues en fibre de carbone apporte des bénéfices immédiats sur les performances de multiples systèmes du véhicule. La réduction de la masse non suspendue améliore la réponse de la suspension, réduit le fading des freins et optimise les caractéristiques d'accélération. Une installation typique permet d'économiser 15 à 25 livres de masse non suspendue par rapport aux alternatives en acier.
Capacité Accrue des Pneus
Les cuves de roues en fibre de carbone permettent l'utilisation de pneus significativement plus larges, améliorant ainsi l'adhérence et les performances en virage. Les applications en course accueillent couramment des pneus jusqu'à 36 pouces de diamètre, offrant des augmentations substantielles de la surface de contact et de la capacité de charge. Cette capacité se traduit directement par des temps au tour améliorés et des performances accrues du véhicule.
Performance Structurelle
Correctement installées, les cuves de roues en fibre de carbone peuvent en réalité renforcer la structure arrière du véhicule en répartissant les charges plus efficacement que les composants d'origine. Le rapport résistance/poids élevé du matériau et sa capacité à être conçu pour des chemins de charge spécifiques créent des structures qui surpassent les alternatives plus lourdes tout en réduisant le poids total du véhicule.
Conclusion
L'installation de cuves de roues en fibre de carbone représente un engagement significatif envers les performances et les capacités du véhicule. Bien que le processus nécessite une attention méticuleuse aux détails et une technique appropriée, les résultats offrent des avantages substantiels en matière de réduction de poids, de capacité des pneus et de performances globales. Suivre ce processus complet en quatre étapes garantit des résultats professionnels répondant aux exigences rigoureuses de la compétition et des applications haute performance.
Le succès dépend d'une planification approfondie, de procédures de sécurité appropriées, d'une découpe et d'un ajustement précis, ainsi que de techniques de collage de qualité professionnelle. Prenez le temps lors de chaque phase de vérifier la qualité et la précision, car les corrections deviennent de plus en plus difficiles au fur et à mesure de l'avancement de l'installation. Avec une exécution correcte, les cuves de roues en fibre de carbone assurent des années de service fiable tout en contribuant à l'amélioration des performances et des capacités du véhicule.
N'oubliez pas que cette modification peut affecter les systèmes de sécurité du véhicule et les réglementations locales. Consultez donc des professionnels qualifiés et vérifiez la conformité avec les règles applicables avant de procéder. L'investissement dans des matériaux de qualité et des techniques d'installation professionnelles porte ses fruits en termes de performances, de fiabilité et de sécurité tout au long de la durée de vie du composant.
Pour ceux qui recherchent l'ultime en matière de modification de performances, les cuves de roues en fibre de carbone représentent le summum de la construction légère et à haute résistance. Installées correctement en utilisant les techniques décrites dans ce guide, elles constituent la base pour des véhicules de performance sérieux qui exigent le meilleur de chaque composant.